Is it necessary to sew an insert into the work book?
The employer is required to fill out the work book within 5 days from the date of hiring the applicant. The following information is entered into the work book (insert):
- place of work;
- position held;
- information about the transfer (if any);
- changes in the name of the enterprise (if any);
- date of dismissal;
- reason for dismissal.
All records should not be abbreviated, with the exception of information that can be abbreviated according to generally accepted rules. Naturally, over time, the sheets in the work book may run out. And that’s when you need to sew in the liner.
Who should buy the book?
In accordance with Government Decree No. 225 of April 16, 2003 (as amended in 2008), the employer is obliged to:
- On an ongoing basis, have in the organization the required number of inserts for the work book.
- When issuing a form for the main document to an employee, the employer has the right to charge him a fee for related expenses. Funds are deducted from wages, of which the employee must be notified, or by transferring funds to the company’s account.
Comment. Due to the fact that the employee in any case bears the cost of purchasing the form, the employer may ask the employee to independently purchase an additional document.
The cost of the form varies depending on the region and can range from 150 to 300 rubles. You can also buy earbuds from online stores that supply the product at lower prices.
How to do it?
How to sew an insert into a work book? The rules on maintaining work books (Resolution No. 225) do not provide clear regulations for sewing in inserts. There are no requirements for where exactly the liner should be sewn or what color the threads should be. There is only one requirement - the insert must form a single whole document with the work book, that is, its simple attachment without sewing is not allowed.
If we think logically, then according to the instructions, the numbering in the work book and the insert must be continuous, therefore, the insert must be sewn in after the last sheet, before the cover.
Regulatory regulation
There is no act of law in Russian legislation that would regulate the process of sewing an insert into the employee’s main document. However, mention of this document and the purpose of its use is contained in Rules No. 225, which were established by the Government of the Russian Federation on April 16, 2003.
These Rules state the need to draw up an addition if all pages of the first document have been completed. It is also clarified that the insert is considered an integral part of the labor contract and is not considered valid without it.
First step
How to sew an insert into a work book? You will need thread, a needle and an awl. It is imperative to make sure that there are indeed no blank sheets in the work book for recording information about admission or dismissal.
The insert should be sewn to the back page of the cover, preferably even to the spread itself. It is necessary to make several stitches so that the liner does not fall out in the future. It is recommended to use threads in muted tones.
After sewing in, the booklet and insert should form a single document. Gluing the insert or fixing it with a stapler is not allowed. This prohibition is enshrined in paragraph 38 of the Instructions for maintaining work books.
Second step
How to sew an insert into a work book step by step? Now you can make an entry directly into the insert. By the way, the first and second steps can be swapped.
Information about the individual to whom the work book belongs is entered on the first sheet of the insert.
A note must be made on the title page of the book indicating that an insert has been issued.
What if you don't sew in the liner?
It seems clear how to properly sew an insert into a work book, but what if this is not done? First of all, the owner of such a book may have problems in the future when applying for a job in another organization or when applying for a pension.
The insert itself without a work book is not valid, even if there are stamps and notes on it.
Errors
It is not allowed to staple the document or glue it to the cover of the work book. It is not advisable to first sew on the form and then fill it out. This may lead to errors when entering data into the title page. You cannot leave the insert inside the work book without sewing it in. The document may get lost.
In practice, the following mistakes are often made:
- continue to enter information about work in the “Information about awards” section,
- glue blank sheets of paper, keep notes on them,
- they sew in old book forms instead of inserts,
- sew the document in the middle of the work book.
Also, you cannot sew in a form if the document is not completely filled out. The organization should always have spare forms so that they can be used if necessary.
Requirements for the form
How to sew an insert into a work book and where to get it? The insert form itself must be of the standard standard and manufactured exclusively at the GOZNAK enterprise. Enterprises are responsible for purchasing such documents. Accordingly, the employer should always have a certain supply of such documents. Although in practice, usually the employee himself purchases the insert so that the HR department sews it into the work book.
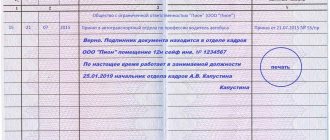
Stamp confirming the issue of the insert
Neither the instructions nor other regulations provide for a place where a stamp should be affixed indicating that the insert has been issued. In practice, such a mark is placed either on the first title page of the work book or on the inside cover.
In this case, neither the first nor the second option will be considered a violation, the main thing is that a mark is placed on the title page so that it does not obscure information about its owner.
A sample stamp is also not provided for in regulatory documents. Therefore, there is a lot of controversy around this issue. Some HR specialists argue that this should be an imprint, others argue that you can make a record by hand and certify it with the company’s seal. Therefore, it is still recommended to purchase a stamp, which can be found in almost any office supply store or ordered from an organization that produces stamps or provides printing services.
The main thing is that if a stamp is affixed, it must be filled out. This entry must contain insert data. The series and number may vary depending on the release date. Typically there are seven numbers and two or three series letters. Inserts purchased after 2010 are of the VT-I series, and before 2003 - AT, and the digital coding in such inserts and work books consists of Roman numerals. Accordingly, the entry on the stamp may be as follows:
“INSERT ISSUED. Series AT No. IIVIV.”
Instructions for filling
The organization can provide the employee with 2 options for ordering forms:
- by cash payment of its cost according to the invoice;
- by writing an application to receive a form.
Both actions are not against the law. But the employer, at his own discretion, can, if necessary, sew the form into the book without charging money from the employee and without informing him of the details of this procedure.
Application for issuance of forms
If a request is received from management to write an application for the provision of an insert, this means that the cost of the form is subject to deduction from wages. This is possible only if there is a written request from the employee with such a request.
The application can be written in free form. It is addressed to the head of the organization, but it may also be transferred to an accountant or personnel officer.
The application must contain a request to receive a form for entering work data and an application to deduct from wages the funds spent on the purchase of the form.
The employee does not need to take the initiative to write an application on his own. But if he nevertheless showed such a desire, then the employer does not have the right to refuse him this.
When entering information into the insert, you must remember that the same rules apply to filling it out as those established for the preparation of the employee’s main document. But it is worth highlighting some additional points:
- The manager during whose work the pages of any section were completely used is responsible for filling out the insert. Usually we are talking about a section containing information about the work.
- The title page of the form indicates the date of its completion, and not the date of registration of the work itself.
Example of filling out the title page - The insert must contain only information that is factual. That is, they are subject to control for changes in surname, education received, etc.
- After the entries on the title page, the employee who completed them must put his signature and the seal of the organization.
- During the employee's further career, additional inserts may be issued, since their number is not limited.
What you should pay attention to
Before filling out the document, it is advisable to ask the employee to answer the questions in the questionnaire. This is necessary to identify changes that have occurred in the employee’s data and to correctly fill out the form.
In the case of obtaining a higher education, which was not recorded on the title page of the employment record, this fact should be noted in addition.
If the employee’s specialty has changed, the employer has the right to indicate a new specialty when hiring, if the employee has submitted the relevant documents.
After reviewing such a document, the HR department employee takes the following actions:
- Makes a photocopy of the submitted document.
- Files it in the employee’s personal file.
- Based on the passport data, he indicates a new surname on the title page of the book.
- On the cover, the labor document records information about the change of name on the inside, referring to the submitted document.
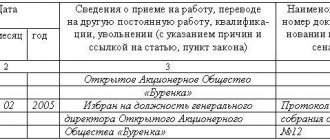
Numbering
It is important to assign a serial number to the first entry in the insert that would comply with existing rules. It is necessary that it exceeds by one the number that was assigned to the last entry in the labor record.
Thus, a certain sequence of serial numbers is preserved. This is necessary to create the integrity of all data that was entered into the document.
Let’s assume that the last entry in the document was numbered “20” and contained information about the employee’s hiring. Consequently, the first mark in the insert sewn into the book will be numbered “21” and may indicate the dismissal or bonus payment of the employee.
How to sew a second insert into a work book?
If an overly active employee came to the company, then it is possible that all the records about his work did not fit in the work book itself and the insert, then you will need to sew in another one. The rules for sewing in the second liner are the same as when adding the first one. It should be sewn to the spread, but after the first insert. Next, information about the owner and a record of admission or dismissal are entered. It is mandatory to again affix a stamp indicating that a new insert has been issued, on which its series and number are recorded and this information is entered into the book of accounting for the movement of work books in the organization.
Correct sequence of actions
The state regulates the basic rules regarding the installation of the liner, but does not consider technical issues related to this process.
For example, it is not indicated where exactly it needs to be filed: at the end of the document, in the middle of the spread, or on one of the initial pages.
However, practical rules have been formed on this issue, which, in combination with legal requirements, make it possible to answer in detail the question of how to correctly file a new form.
Typically, the last page of the document is used for this purpose. An awl is used to poke holes in the book and on the inside of the insert. Then they are hemmed with thread.
It is not allowed to use an unattached, but simply inserted insert. In addition, it is not allowed to glue or staple.
On the first page, an attachment note is made indicating the number and series. The inscription can be made with a black or blue ballpoint pen; according to the rules, the enterprise must have a special seal.
Sometimes errors may occur. Here are some of them:
- The additional form was filed incorrectly. In this case, it is destroyed, and another copy is filed in its place.
- Sometimes, if the connection is incorrect, there is no way to disconnect. One of the possible cases is that the liner was not hemmed, but glued. And this is not allowed. To correct it, you will have to write out a duplicate document and re-attach a new form.
- There were spelling errors when filling out. They can be fixed in the prescribed manner or the liner can be disconnected and a new one installed.
What if an incorrect entry was made?
How to sew an insert into a work book, a sample of which is presented above? There is nowhere in our lives without the human factor, and if after sewing in the record is damaged, then changes are not allowed in the new form. You'll have to undo everything and insert a new form.
If the insert was received from the employer, then you should draw up a report stating that the form was damaged and destroy it. If an entry has already been made in the work book indicating that the insert has been issued, then you will need to make an entry stating that the stamp is invalid.
The employee changed his last name
In this case, the employee must write a statement addressed to the director, which indicates the reason for the change of name.
The application must be accompanied by documents confirming the fact of the changes: passport, divorce document, certificate of marriage, etc. Application form for a change of surname for an employer in .doc (Word) format After acceptance of the application, a number of steps are taken:
- The director puts a resolution on the application and hands it over to the employee.
- The employee visits the HR department, where he makes an entry about the change of passport data directly in the work book.
- After making changes, the director issues an order, which presents the procedure for changing the last name.
- As soon as the order comes into force, the person responsible for making changes to the documentation can begin work.
The changed data is again sent to the employer for the required stamps and signatures.